When Paradox Rift released, Roaring Moon ex was all the rage. In online tournaments in the two weeks leading to LAIC, the first event of the format, it was the most played deck — but that’s not really a surprise. It was new, it was fun, and since the deck was available for free on the TCG Live Battle Pass, many players, myself included, decided to try the deck. We already knew how to play Mew or Giratina, but there was no consensus on the best way to build Roaring Moon ex, so everyone was trying their own version. At the time, I couldn’t decide which variant was best; the format was still new, no one was sure which decks were the best, and after a few days, people had learned how Roaring Moon played and it didn’t feel as strong anymore.
Since then, Roaring Moon has had a fairly average showing. At the time of writing, it is 12th in the LimitlessTCG rankings (based on performances in official events) in the Paradox Rift format. It got 9th place at Stuttgart regionals and 10th in Gdansk, but no top 8… until Champions League Kyoto on December 23rd, where Shuma Kikuchi got 2nd place with a very interesting build. I think this surprising result led more players to try the deck again, this time with the benefit of an established metagame.
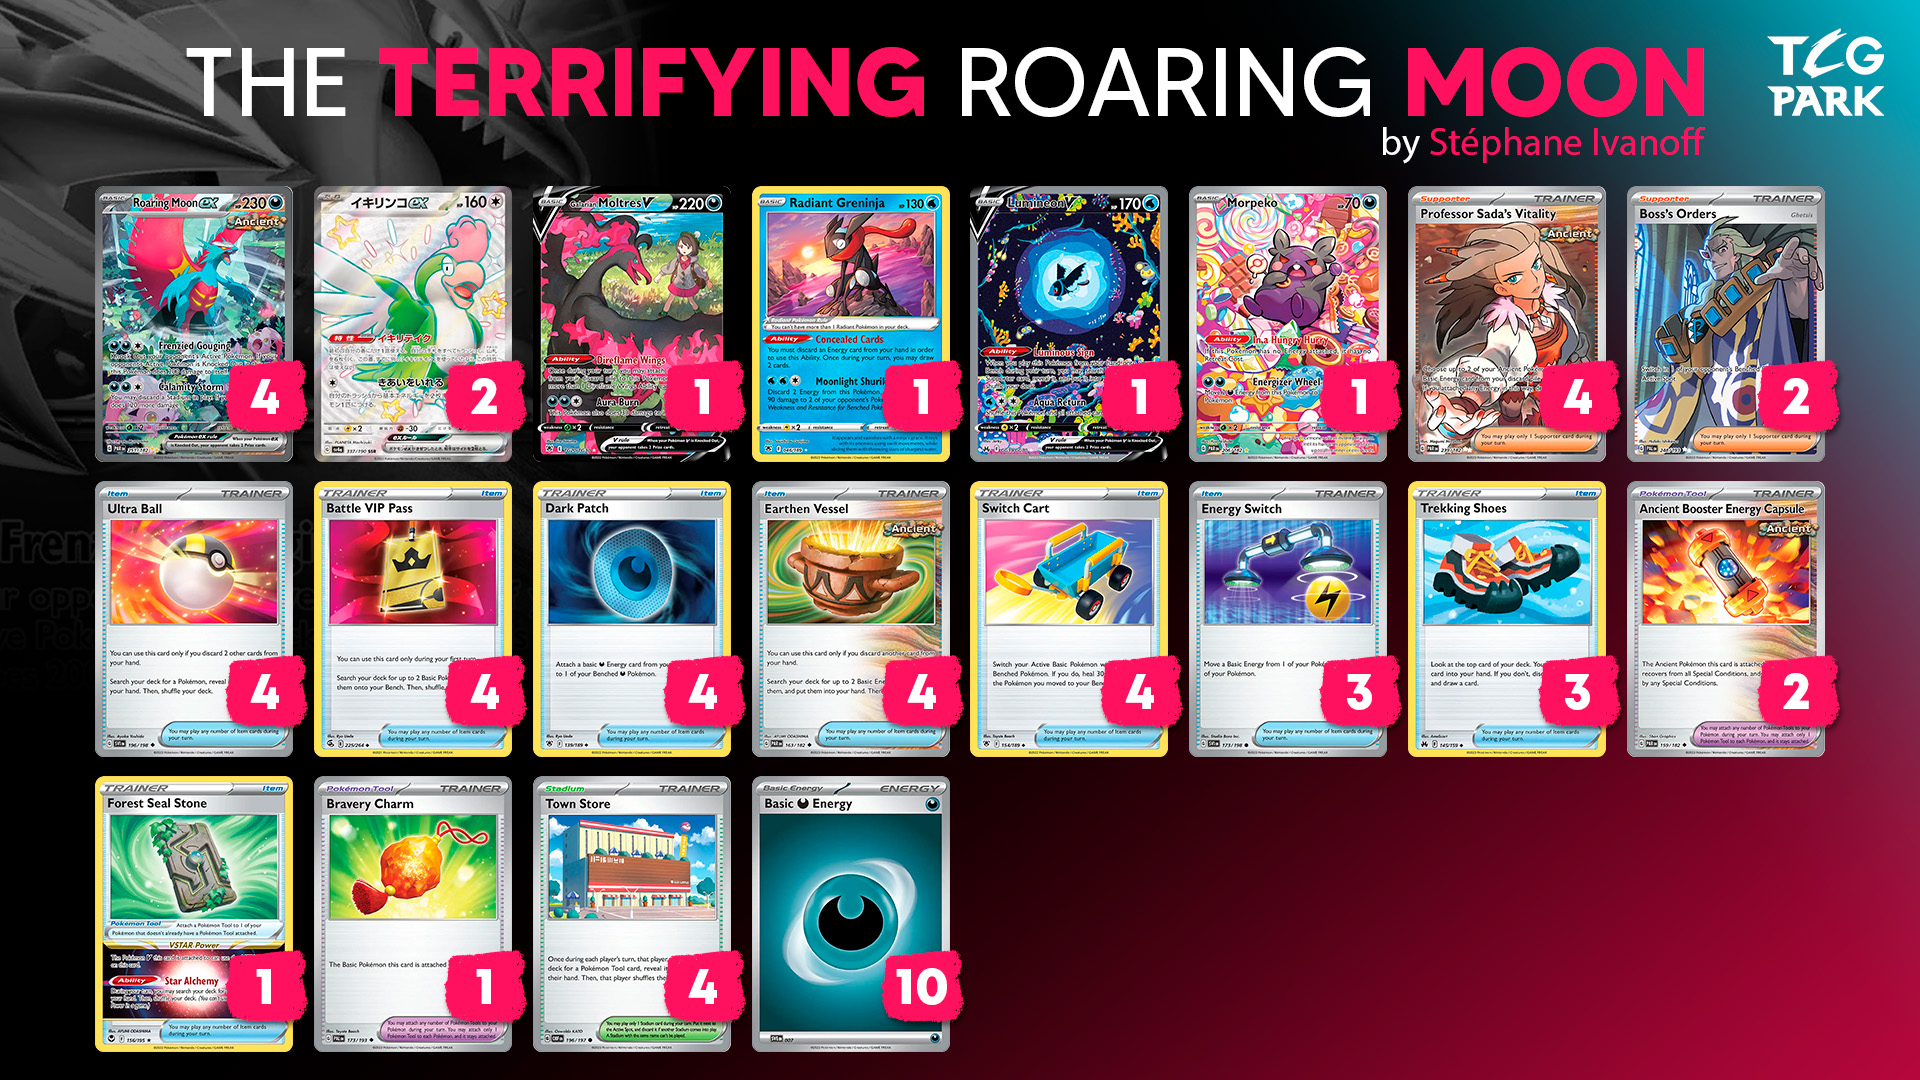
I think Roaring Moon has the potential to do very well in the right metagame, so in this article, I’ll discuss how to play it, and especially how to build my favorite variant, the Item-heavy Darkrai VSTAR variant which got 2nd palce in Kyoto.
Fast or slow?
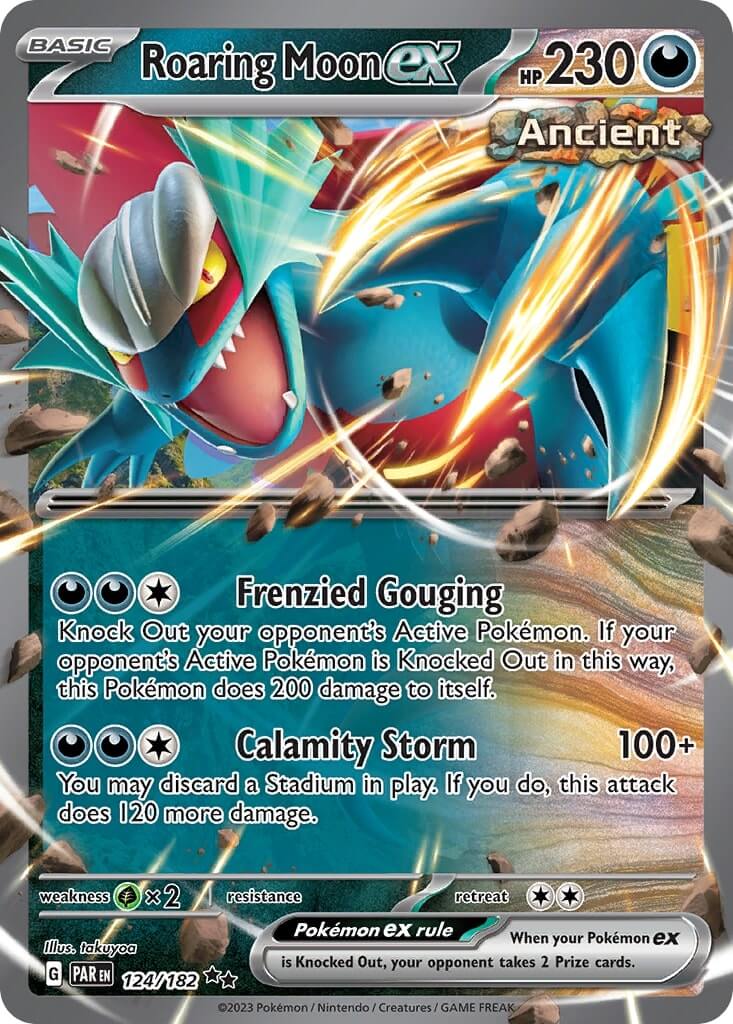
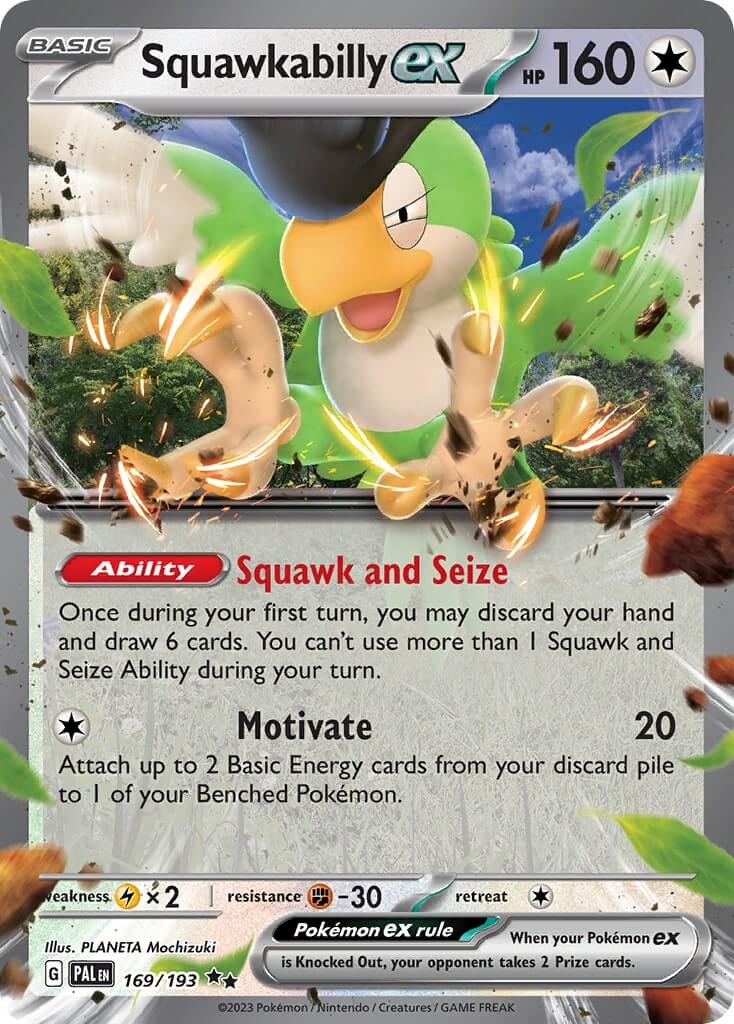
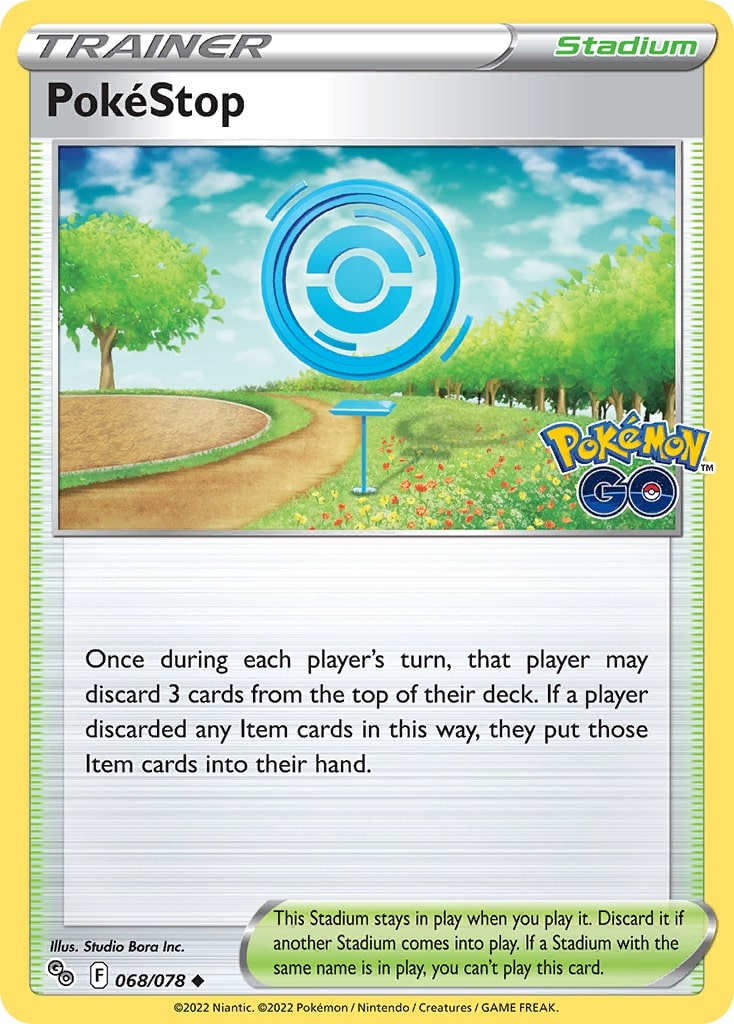
The core of Roaring Moon ex is this: discard Darkness Energy with Ultra Ball, Radiant Greninja, or Squawkabilly ex (among others), then attach Energy from the discard with Professor Sada’s Vitality and Dark Patch. This way, you can power up multiple attackers and KO whatever the opponent has in play with Calamity Storm or Frenzied Gouging. Because Dark Patch and Earthen Vessel are such good cards for this game plan (not to mention Battle VIP Pass and others, of course), PokéStop quickly became the Stadium of choice for Roaring Moon. This kind of decklist often uses Cross Switcher as well, and can be called a “fast” Roaring Moon list: the deck goes as fast as possible, and chooses to go second to attack on the first turn and take the lead in the Prize race. Some of these lists include Water Energy and Energy Switch to attack with Radiant Greninja (and possibly Cancelling Cologne), adding an additional threat: now, even decks relying on one-Prize Pokémon, like Gardevoir and Lost Box, must have Manaphy in play or Roaring Moon can take a game-winning lead.
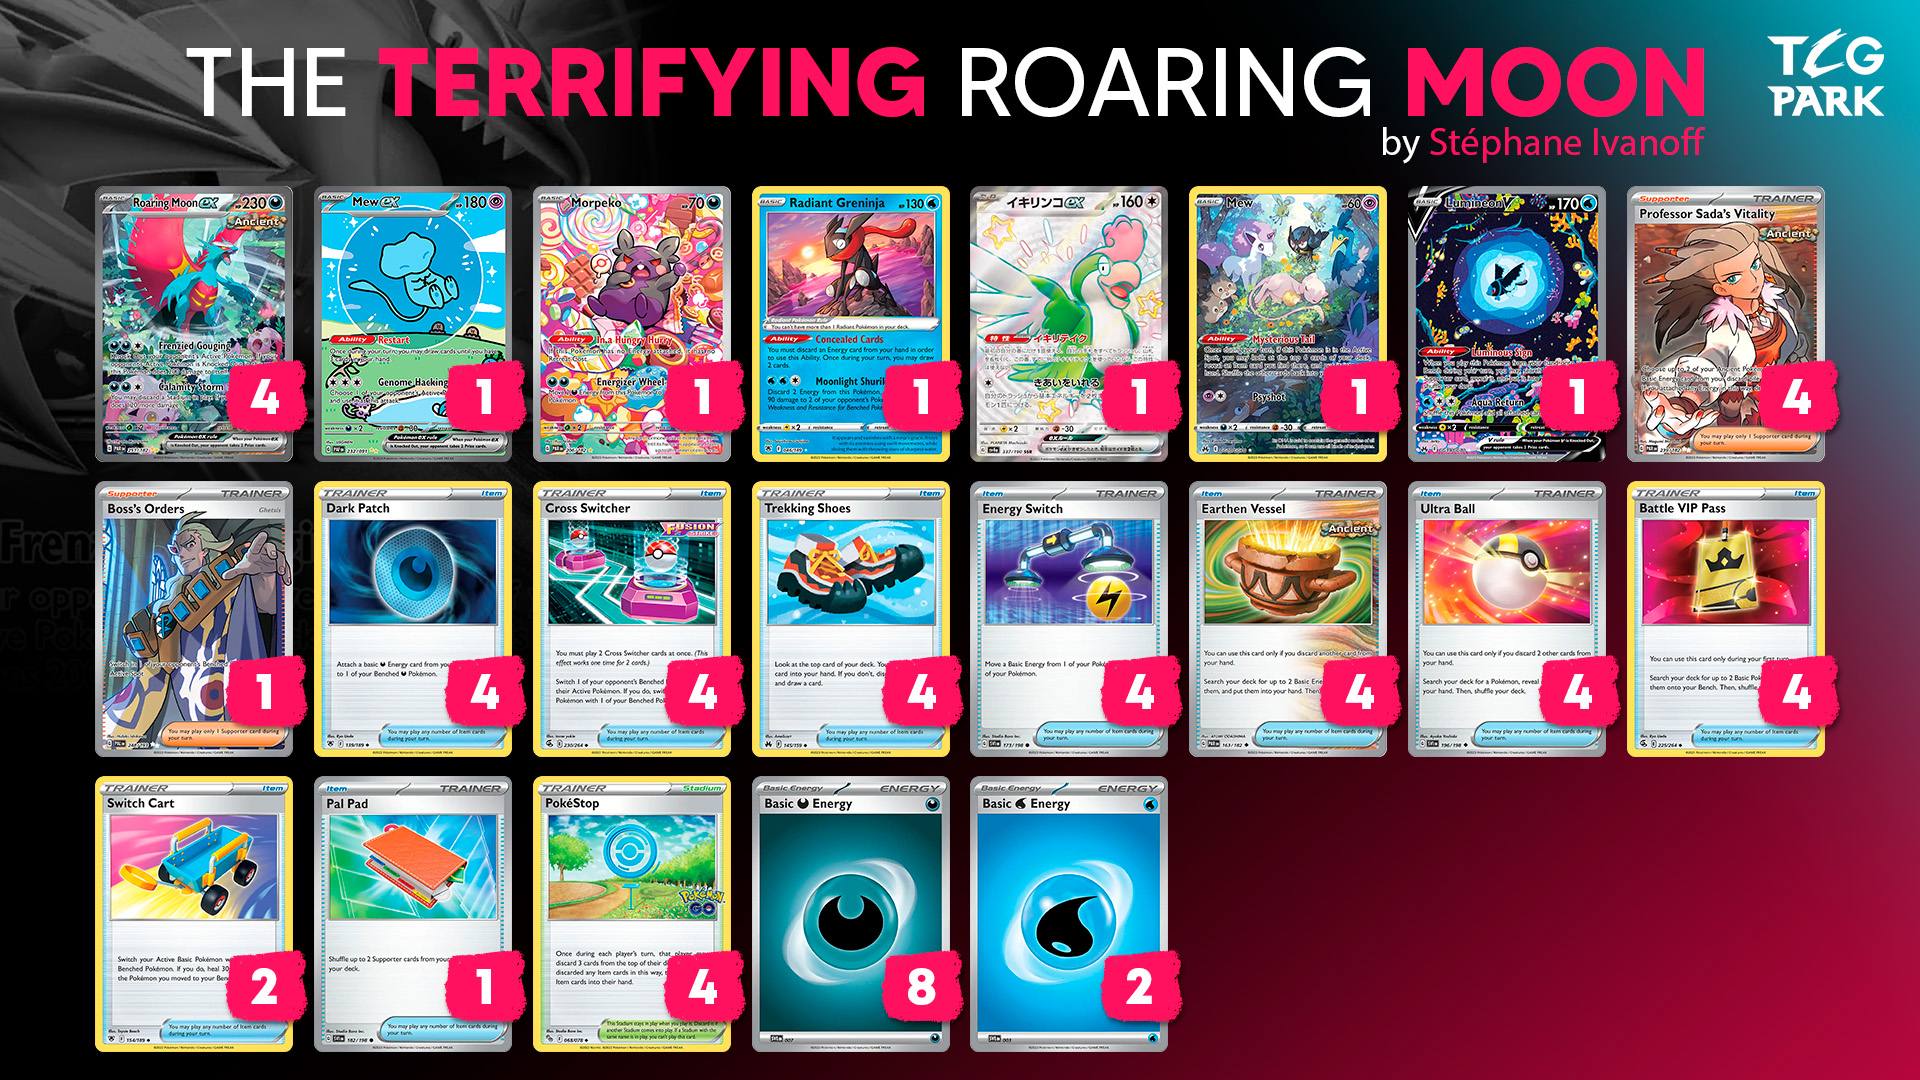
Maciej Dmoch’s 10th place deck from Gdansk Regionals is a good example of this:
| Pokemon | Trainers | Energy |
|---|---|---|
| 4 Roaring Moon ex PAR 124 | 4 Professor Sada’s Vitality PAR 170 | 8 Darkness Energy |
| 1 Mew ex MEW 151 | 1 Boss’s Orders PAL 172 | 2 Water Energy |
| 1 Morpeko PAR 121 | 4 Dark Patch ASR 139 | |
| 1 Radiant Greninja ASR 46 | 4 Cross Switcher FST 230 | |
| 1 Squawkabilly ex PAL 169 | 4 Trekking Shoes CRZ 145 | |
| 1 Mew CEL 11 | 4 Energy Switch SVI 173 | |
| 1 Lumineon V BRS 40 | 4 Earthen Vessel PAR 163 | |
| 4 Ultra Ball SVI 196 | ||
| 4 Battle VIP Pass FST 225 | ||
| 2 Switch Cart ASR 154 | ||
| 1 Pal Pad SVI 182 | ||
| 4 PokéStop PGO 68 |
On the other hand, as strong as PokéStop can be, it can also lose its player games if it discards key cards. This can be mitigated to some extent by playing Items like Super Rod and Pal Pad to recover discarded cards, but still, if you’ve played with PokéStop, you’ve experienced the pain of trying to get an Ultra Ball for Lumineon V for Boss’s Orders for game, only to discard Lumineon V, or Boss’s Orders with PokéStop. Even if the card has huge upsides, its unreliability makes it a dangerous choice for high stakes tournaments.
Some players opted for “slow” lists instead, using other Stadiums. I think it is very interesting, in that regards, to compare Luigi Vezzoni’s 9th place list from Stuttgart Regionals:
| Pokemon | Trainers | Energy |
|---|---|---|
| 4 Roaring Moon ex PAR 124 | 4 Professor Sada’s Vitality PAR 170 | 10 Darkness Energy |
| 2 Squawkabilly ex PAL 169 | 2 Boss’s Orders PAL 172 | |
| 1 Galarian Moltres V CRE 97 | 4 Ultra Ball SVI 196 | |
| 1 Radiant Greninja ASR 46 | 4 Battle VIP Pass FST 225 | |
| 1 Lumineon V BRS 40 | 4 Dark Patch ASR 139 | |
| 1 Morpeko PAR 121 | 4 Earthen Vessel PAR 163 | |
| 4 Switch Cart ASR 154 | ||
| 3 Energy Switch SVI 173 | ||
| 3 Trekking Shoes CRZ 145 | ||
| 2 Ancient Booster Energy Capsule PAR 159 | ||
| 1 Forest Seal Stone SIT 156 | ||
| 1 Bravery Charm PAL 173 | ||
| 4 Town Store OBF 196 |
Town Store is the Stadium of choice here, as it can get Forest Seal Stone, and defensive Tools in Ancient Booster Energy Capsule and Bravery Charm. This kind of list doesn’t attack on turn 1 as often (although Galarian Moltres V + Energy Switch helps), but it can withstand hits better. With an Ancient Booster Energy Capsule, Roaring Moon ex has 290 HP and can withstand even something like Giratina VSTAR’s Lost Impact!
Mitigating PokéStop’s weaknesses

Instead of cutting PokéStop and making the deck more reliable, but less explosive, some players tried adding cards to better exploit PokéStop, by making it more powerful and less dangerous. Enter one of my favorite cards, Crossceiver.
I have somewhat of a history with Crossceiver. Back in 2022, when PokéStop was just released, I was obsessed by the card. A Stadium that could draw three cards per turn? That sounded like an Expanded staple. There had to be a way to make it work. I spent a month trying to perfect Dialga VSTAR (another card that appealed to me due to it feeling like a card that was broken in Expanded) with PokéStop, and eventually thought of Crossceiver: an Item which, like Cross Switcher, had to be played in pairs, that could recover a Pokémon or Supporter from the discard. Its power level was much weaker than Cross Switcher, but it fit very well with PokéStop. The issue with PokéStop was that it could discard Pokémon and Supporters: Crossceiver could just get them back! Long story short, I took the risk of playing Dialga at Worlds, overestimated my Palkia VSTAR matchup, and ended up with a mediocre finish.
Being probably the only player to have played Crossceiver at the World Championships, you can imagine how elated I was when I saw, a few days after the Paradox Pokémon released in Japan, that someone had won a City League with a version of Roaring Moon ex that included PokéStop, Cross Switcher and Crossceiver, plus Darkrai VSTAR to recover two of these key Item cards! I had to try the deck, and honestly, it felt pretty good. Even though I eventually abandoned it, it may have been the deck I had the most fun with in this format.
And then, months later, this same deck got 2nd place in Kyoto.
This puzzled some players. Crossceiver isn’t a very good card, after all. But as I mentioned, it fits very well in a deck with PokéStop, and allows players to use the Stadium without fear, which is absolutely indispensible. The issue with most PokéStop lists is that sometimes, you can’t use PokéStop because discarding the wrong card would lose you the game, so you have to avoid using the card that your deck is basically built around. That’s not the case if you have Crossceiver.
You may be wondering, why Crossceiver and not Pal Pad and Super Rod, cards that are usually considered better, that would also mitigate the PokéStop risk? The issue with these two cards is that they make you lose less, but they don’t help you win. With Pal Pad in your deck, if you discard your Iono, you can shuffle it back, sure, but that doesn’t help you use it, and there’s still the risk that it will be discarded again in a turn or two. Pal Pad and Super Rod are only very rarely cards you want to hit off PokéStop after being hit by Iono to 2.
On the other hand, Crossceiver is actively useful. You need two in hand, sure, but if you have do, you can actually get your Iono back and play it — or your Professor Sada’s Vitality, or your Darkrai VSTAR. This means that discarding Iono does not inspire “oh no, I’ll need to find Pal Pad” but “cool, now I can use it when I want”. (The more experienced among you will once again recognize the Expanded player’s train of thought, used to thinking of the discard as a resource to be used.)
Here’s my current list, which is the Kyoto list with a Mew instead of a Lost Vacuum.
| Pokemon | Trainers | Energy |
|---|---|---|
| 3 Roaring Moon ex PAR 124 | 4 Professor Sada’s Vitality PAR 170 | 9 Darkness Energy 7 |
| 1 Morpeko PAR 121 | 1 Boss’s Orders PAL 172 | |
| 1 Darkrai V ASR 98 | 1 Iono PAL 185 | |
| 1 Darkrai VSTAR ASR 99 | 4 Dark Patch ASR 139 | |
| 1 Squawkabilly ex PAL 169 | 4 Battle VIP Pass FST 225 | |
| 1 Lumineon V BRS 40 | 4 Trekking Shoes CRZ 145 | |
| 1 Radiant Greninja ASR 46 | 4 Cross Switcher FST 230 | |
| 1 Mew CEL 11 | 4 Crossceiver FST 231 | |
| 3 Ultra Ball SVI 196 | ||
| 3 Earthen Vessel PAR 163 | ||
| 2 Nest Ball SVI 181 | ||
| 1 Switch Cart ASR 154 | ||
| 1 Switch SVI 194 | ||
| 1 Super Rod PAL 188 | ||
| 4 PokéStop PGO 68 |
The same way that Crossceiver makes PokéStop much safer, Darkrai VSTAR adds another layer of insurance by making sure you have a way to get Crossceiver and/or Cross Switcher back. Ideally, you keep its VSTAR Power until the late game, so that you can get Cross Switcher for game if you get Iono’d. However, many times, you can use it in the midgame to secure a play. Being able to get one Crossceiver or Cross Switcher to go with the one in your hand brings a lot of value here, but you can of course also use it to get Switch Cart, Dark Patch, or something else.
Similarly, I value Mew a lot for its ability to get me the card I need when I want — usually, but not always, a Cross Switcher. Just like Darkrai VSTAR, having Mew in play makes you safer against Iono, and unlike Darkrai VSTAR (and other candidates like Mew ex), Mew doesn’t care about Path to the Peak.
I try to get Darkrai in play every game where one of the pieces isn’t Prized, as it’s very valuable. If the opponent goes after it, they’re generally leaving my hand and my Roaring Moon untouched, which is fine by me.
You may be surprised to see only three Earthen Vessel in this deck, but I think it’s fine. The first Vessel is great, the second is fine and the third is playable, but the fourth is usually unplayable. Even the third often finds value only because some Energy got back in the deck with Super Rod — I would go so far to say that it’s Super Rod’s main value, and that it can otherwise be cut for another Switch Cart, for example.
Trekking Shoes is the card that really makes this version work. It’s more draw that can be drawn with PokéStop. It’s thanks to Trekking Shoes that the odds of getting an Energy (or Vessel) on turn 1 are high enough that you don’t need to play four Vessel. In the past, I’ve sometimes cut Trekking Shoes for other cards, but I think it’s a mistake in this deck to play fewer than four.
A quick matchup guide
I haven’t played this version of the deck enough to be sure of how to play every matchup, so I’ll stick to the basics here.
Charizard ex: I find that this matchup is fairly favored if you have a good start. Ideally, you can take two Prizes before they start attacking. Either you can KO Rotom V on turn 1 or 2, or you can KO a small Pokémon like Charmander or Pidgey on turn 1 with Morpeko and hope they don’t have to return KO. Some Charizard lists are cutting both Defiance Band and Justified Gloves in favor of TM Devolution, and that means they can’t KO Roaring Moon ex if you only take one Prize, so if you can avoid benching Squawkabilly ex and Lumineon V (and you delay benching Darkrai V), you don’t have to fear an early revenge KO on your Roaring Moon ex. Then, you should be able to keep winning the Prize race thanks to Frenzied Gouging. Things can be a bit harder if they play Radiant Charizard, but most players have cut it.
Giratina VSTAR: The threat of Calamity Storm means that the opponent can’t use Abyss Seeking early on, so they can be slow to fill the Lost Zone. If you can get some Cross Switcher to KO Giratina V on the Bench, you can get a good lead. Avoid Benching both Mew and Morpeko to avoid a Radiant Greninja play and use Calamity Storm rather than Frenzied Gouging so you don’t self-damage and put yourself at risk against Sableye. Path to the Peak can make you lose games, but if you don’t brick, you should be at least even.
Gardevoir ex: Despite Gardevoir ex’s Dark weakness, this matchup is unfavored. Gardevoir simply trades too well with your two-Prize attackers, even if you get the lead (which you will). Your best bet is to take a Prize lead, try to maintain it by targetting Gardevoir ex as soon as it comes down (keep your Cross Switcher for it), and using Morpeko to revenge KO Gardevoir in the late game, in combination with Iono. Also, avoid benching Squawkabilly ex if possible, as its an easy target for Scream Tail.
Miraidon ex: This tends to be a simple Prize race. You want to go second and try to take the first Prizes; if you go first, though, have a one-Prizer in the Active Spot and another one on the Bench (in case of Escape Rope), so your opponent can only take one Prize. Then, take Prizes two by two. If you do so, you’ll only lose if your opponent can take three Prizes in one turn with Iron Hands ex (on Squawkabilly ex, Lumineon V or a self-damaged Roaring Moon ex). Darkrai VSTAR can be used to KO Iron Hands ex (you need seven Energy in play, which is not as hard as you’d think given it can get Dark Patch back from the discard), so consider it as an attacker.
Mew VMAX: Thanks to Mew VMAX’s Dark weakness, this matchup is favored, although not an autowin by any means. Against the DTE variant, you should aim to KO two Mew VMAX to win the game. Against the Fusion variant, you’ll often have to settle for a 1-3-2 Prize map, dealing first with Meloetta and then Mew VMAX. In this matchup too, Darkrai VSTAR is a fairly solid attacker: it can KO Mew VMAX easily thanks to Weakness, while its HP make it harder to KO (Roaring Moon ex has 230 HP, so if the Mew player uses three Power Tablets on Darkrai VSTAR, they won’t be able to deal with Roaring Moon).
Lost Box: This matchup is tough, as Roaring Moon doesn’t have good ways to deal with one-Prize Pokémon. Against SableZard, you’ll eventually lose the Prize race because of Radiant Charizard; against Kyogre, your board full of 230 HP Pokémon will get destroyed by Aqua Storm. Iono is your best bet there.
Rapid Strike Urshifu VMAX / Inteleon VMAX: On the flip side, this matchup is very good. The opponent’s high HP means nothing if you can OHKO them with Frenzied Gouging, and you don’t play easy targets for their plays (avoid using Mew and Morpeko if possible). The ideal Prize map is to KO an Inteleon V or Urshifu V for two Prizes, Octillery for one, and then they can’t stop you from using Frenzied Gouging for your last Prizes. Even if they somehow managed to take four Prizes at that point and damaged your Roaring Moon such that using Frenzied Gouging would cause a tiebreaker game, that’s basically a win for you as you’ll be able to take the first Prize anyway. (This piece of advice also applies against other decks that don’t attack on turn 1, like Charizard ex.)
Snorlax Stall: Another great matchup, where Darkrai VSTAR shines spectacularly. Between Cross Switcher, Switch, Switch Cart, and Star Abyss for the latter two, you can swich out of the Active spot six times (plus, you can use Boss’s Orders on Rotom V to shut off Snorlax’s Ability for one turn as you take two Prizes), so it’s almost impossible for the opponent to lock you with Counter Catcher, unless they get very lucky with Miss Fortune Sisters. But even better, you can prevent them from using Counter Catcher in the first place, by using Frenzied Gouging. If you use it twice, you’ll have taken two KOs, and KO’d your own Roaring Moon ex. At four remaining Prizes each, the opponent isn’t behind and can’t use Counter Catcher. Of course, giving Prizes to the opponent doesn’t matter against Stall… at least the standard version. Beware of more advanced lists, like those with Pidgeot ex, as they can play surprising techs, like Radiant Charizard.
Iron Hands: the final piece of the puzzle?
I haven’t covered every matchup out there, but as you can extrapolate, in general, Roaring Moon ex struggles against one-Prize decks because it doesn’t have any good option: dealing 220 damage with a two-Prizer, sacrificing a Stadium, is not a good way to fight Cramorant or Gardevoir. As discussed, attacking with Radiant Greninja was a possible solution to this issue, but as this strategy started to get more popular, players got used to playing Manaphy against Roaring Moon, so the plan didn’t work very often.
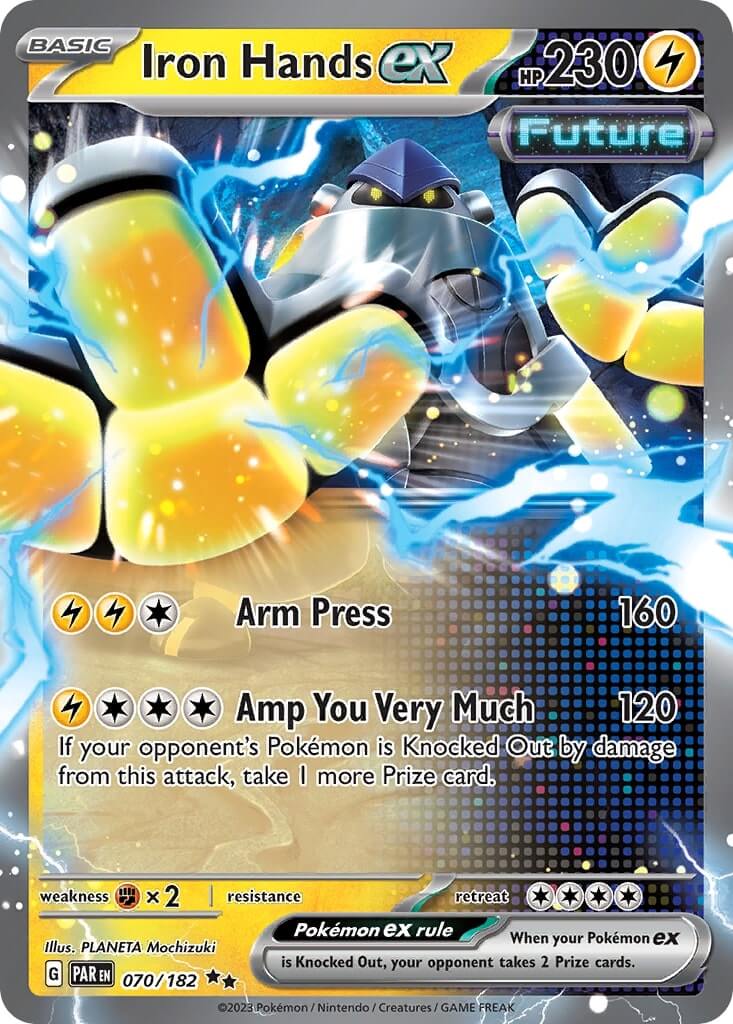
What other card can be used to deal with one-Prize Pokémon? You can probably guess, given that it’s used for that purpose in Miraidon, Chien-Pao, Lost Box… and the title of this section is another clue. I’m, of course, talking about Iron Hands ex. In theory, Iron Hands ex can be used to take two Prizes against the kind of targets that Roaring Moon ex matches poorly against, helping especially against Lost Box and Gardevoir. (Yes, it’s the same pair that gave new life to Lost Box. [https://www.tcgpark.com/blog/how-lost-box-adapts-to-the-paradox-rift-meta]) You may have seen this version already, as Azul Garcia Griego had the same idea, and similar lists have been played in Japan for some weeks as well.
Of course, the question of how to power up a four-Energy attacker, that can’t be targeted by Dark Patch and Professor Sada’s Vitality, is crucial. One option is to use a high count of Energy Switch, and possibly Double Turbo Energy. However, this would amount to changing the deck’s build entirely.
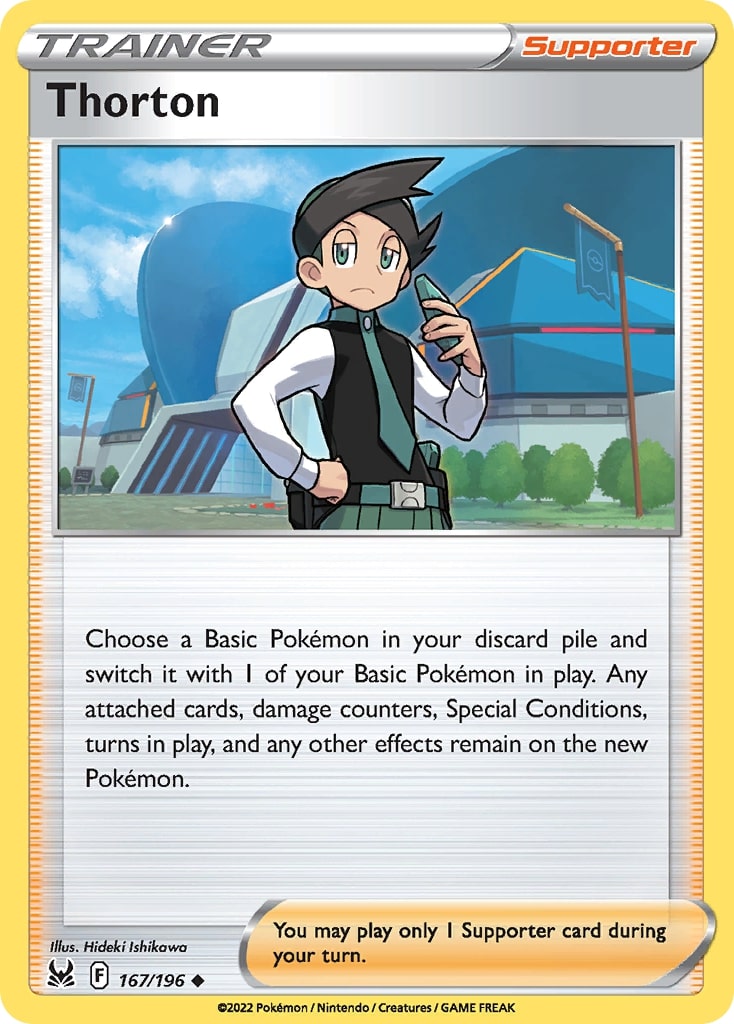
Instead, I think that Iron Hands ex can fit very well into an Item-heavy, PokéStop-focused variant, thanks to Thorton. This deck already discards a lot of cards, through PokéStop, Ultra Ball, etc., so Iron Hands ex can find its place in the discard. Then, we can play Thorton (which can also be discarded, because we can get it back with Crossceiver) and turn Roaring Moon into Iron Hands. Getting a Lightning Energy on a Roaring Moon with Sada is crucial to keep this threat. In order to make it easier to have a Thorton target, I think that Galarian Moltres V is a good addition as well.
I think this idea requires more testing, but at the very least, as a starting point, I recommend my list above with these changes:
-1 Iono, -1 Boss’s Orders, -1 Super Rod, -2 Dark Energy ; +1 Iron Hands ex, +1 Galarian Moltres V, +1 Thorton, +2 Lightning Energy. Maybe Morpeko can be cut as well for another Switch Cart.
Is Roaring Moon a hidden gem or can it never live up to its potential? It’s hard to say. The reveal of Mist Energy, which protects Pokémon from effects of attacks (that includes Frenzied Gouging) and will come out in our next set, Temporal Forces, means that Roaring Moon’s best days might be now… but then again, who knows what the future holds. If there’s one last reason to try out Roaring Moon, especially the Crossceiver version, it’s this: it’s extremely fun to play! If that doesn’t convince you…
As always, thanks for reading!
Stéphane