
As I mentioned last week, I chose to play Lost Toolbox with Kyogre at the European International Championships. I felt like, although it was the most expected deck in the room, it was a very strong pick anyway. Even though Lost Box had a disappointing performance compared with its play rate, it was still a strong deck for the event, considering everyone was preparing for it. I believe that, now that other threats have appeared in the metagame (notably, Gardevoir ex doing better than expected), Lost Box should do better in the next events.

The Kyogre variant of Lost Box is, in my opinion, the best and most interesting variant of the deck. It uses the Turbo engine (Forest Seal Stone and Lost Vacuum) which can potentially allow for turn 1 Mirage Gate, in order to threaten the opponent’s board very quickly, but it also has Kyogre for the late game, so it doesn’t run out of gas. This variant first appeared post-rotation when Japanese player Sora Irisa (@trevenant_marsh) made top 16 with it at Champions League Aichi. It was then used by various players in various tournaments, including a recent second place at the Korean Regional League. The deck also performed well without Kyogre (which changes a few things), notably winning the Taiwan Regionals, but I’ll focus on the Kyogre variant of the deck because it has more options, and I think a better matchup spread. Besides, if you understand how to play the Kyogre variant, you can play the deck without Kyogre as well.
It’s worth mentioning that, after SV2 released in Japan, Kyogre became the most successful way to play Lost Toolbox. This is likely because of the new comeback cards, especially Iono, that debuted in that set. By avoiding taking many Prizes early, Kyogre is not as vulnerable to these cards. I expect that the same thing will happen in June in our metagame upon Paldea Evolved‘s release.
Decklist
Here’s Sora’s original decklist:
| Pokémon – 12 |
|---|
| 4 Comfey LOR 79 |
| 2 Sableye LOR 70 |
| 1 Cramorant LOR 50 |
| 1 Radiant Greninja ASR 46 |
| 1 Dragonite V PR-SW 154 |
| 1 Raikou V BRS 48 |
| 1 Kyogre CEL 3 |
| 1 Manaphy BRS 41 |
| Trainer Cards – 37 |
|---|
| 4 Colress’s Experiment LOR 155 |
| 2 Klara CRE 145 |
| 4 Mirage Gate LOR 163 |
| 4 Battle VIP Pass FST 225 |
| 4 Switch Cart ASR 154 |
| 4 Escape Rope BST 125 |
| 3 Trekking Shoes CRZ 145 |
| 3 Lost Vacuum CRZ 135 |
| 2 Energy Recycler BST 124 |
| 2 Nest Ball SUM 123 |
| 1 Hisuian Heavy Ball ASR 146 |
| 2 Forest Seal Stone SIT 156 |
| 2 Beach Court SVI 167 |
| Energy – 11 |
|---|
| 5 Water Energy 3 |
| 3 Psychic Energy 5 |
| 3 Lightning Energy 4 |


This list uses the usual Lost Zone tools, such as Comfey and Colress’s Experiment. Only one Cramorant is needed because this deck aims to use better attackers, like Radiant Greninja and Sableye, as fast as possible, so Cramorant is usually only used on turn 1 going second. Forest Seal Stone can be used on Dragonite V or Raikou V to get any card you need, then you can play Lost Vacuum to discard it (or a Beach Court) in order to add two cards to your Lost Zone. With a Colress’s Experiment, three Flower Selecting, and a Lost Vacuum on one of your own cards, you can reach the magic number of seven cards in the Lost Zone on the first turn, although that’s not super common. However, the deck will most likely reach that number on the second turn going first (and can usually use Sableye’s Lost Mine on the second turn when going second).
In other words, when going first, you can usually use Radiant Greninja’s Moonlight Shuriken or Dragonite V’s Dragon Gale on turn 2. The former is very useful against other Lost Box decks and setup decks such as Gardevoir, while the latter is excellent against decks that use Pokémon V, such as Miraidon and Arceus variants. Raikou V can also attack instead of Dragonite. It deals fewer damage, but requires fewer Energy. It is the best attacker to use against Klefki and Empoleon V, which are both very annoying for Lost Box.
Kyogre is used at the end of the game. If you’re not familiar with the card, here’s how it works. Thanks to Colress’s Experiment, Concealed Cards, and Flower Selecting, you can draw a lot of cards every turn. After a few turns, you can empty your deck entirely. At this point, you can play down Kyogre, attach a Water Energy to it, use both Energy Recycler to put Energy back in your deck (ideally, at least seven in total), then use Mirage Gate to attach Energy to Kyogre. Since your deck was empty before you used Energy Recycler, there are now only Energy cards in it. You can then use Aqua Storm and discard these Energy cards in order to deal 250 damage to two of your opponent’s Benched Pokémon, taking up to four Prizes in the process. Of course, there are variations; sometimes, you don’t have to empty your deck entirely, as you don’t need to hit 250 damage, so you can afford to hit one or two non-Energy cards, but that’s the basic idea. Kyogre is especially good in matchups against big Pokémon, like Arceus VSTAR / Giratina VSTAR or Miraidon ex, where it can deal a lot of damage in one turn. These decks rarely play Manaphy. (Even if they do, you can first get rid of it thanks to Sableye!)
The only thing I don’t like in the list above, though, is the Trekking Shoes. I think the card is decent enough, and helps with the speed aspect of the deck, but I think there are better cards to run in its stead, such as more Nest Ball, Pokégear 3.0, or Collapsed Stadium. Trekking Shoes may have an advantage in best of one settings, where the value of getting an explosive turn 1 once is higher, but for best of 3 tournaments, I think other cards are better.
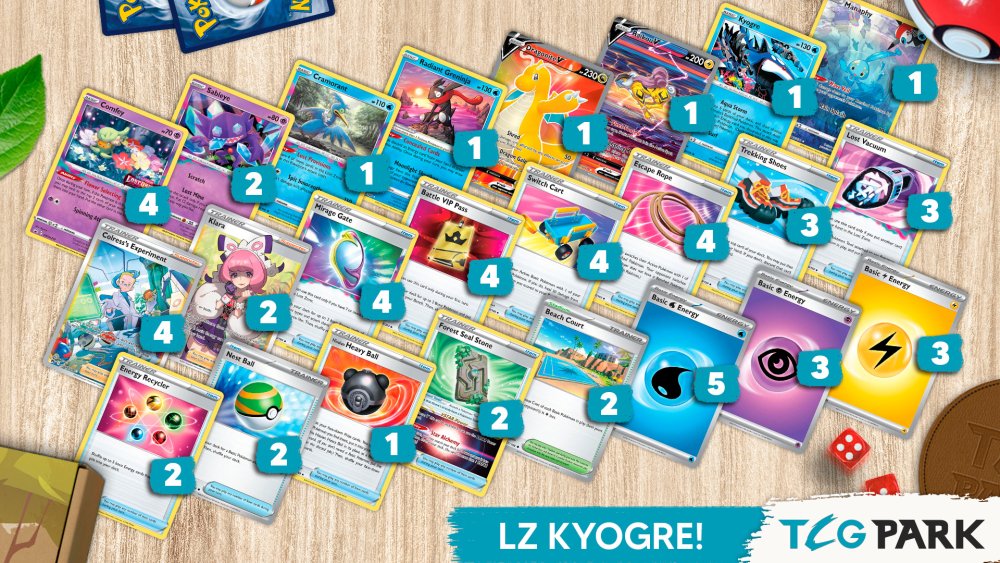
With that in mind, here’s my current decklist, which is the one I recommend playing:
| Pokémon – 12 |
|---|
| 4 Comfey LOR 79 |
| 2 Sableye LOR 70 |
| 1 Cramorant LOR 50 |
| 1 Radiant Greninja ASR 46 |
| 1 Dragonite V PR-SW 154 |
| 1 Raikou V BRS 48 |
| 1 Kyogre CEL 3 |
| 1 Manaphy BRS 41 |
| Trainer Cards – 37 |
|---|
| 4 Colress’s Experiment LOR 155 |
| 2 Klara CRE 145 |
| 4 Mirage Gate LOR 163 |
| 4 Battle VIP Pass FST 225 |
| 4 Switch Cart ASR 154 |
| 4 Escape Rope BST 125 |
| 3 Lost Vacuum CRZ 135 |
| 1 Pokégear 3.0 SVI 186 |
| 3 Energy Recycler BST 124 |
| 2 Nest Ball SUM 123 |
| 1 Hisuian Heavy Ball ASR 146 |
| 2 Forest Seal Stone SIT 156 |
| 2 Beach Court SVI 167 |
| 1 Echoing Horn CRE 136 |
| Energy – 11 |
|---|
| 5 Water Energy |
| 3 Psychic Energy |
| 3 Lightning Energy |
As you can see, there aren’t that many changes. Pokégear is a small consistency boost for the deck, but given how much it wants to play Colress’s Experiment on most turns, it’s good to have that option. I also chose to run a third Energy Recycler. Energy Recycler is a crucial card for the Kyogre combo. If you only run two, you can’t afford to Lost Zone one or use one early, unless you know you won’t use Kyogre that game. Having a third Energy Recycler allows you to throw one away (or have one Prized) and still use Kyogre to finish the game. It’s also important against Lugia VSTAR, because your cards are at risk of being discarded by Tyranitar V’s Cragalanche, so having extra copies of the most important ones is good. Besides, I think redundancy is fairly important in Lost Zone decks.
Finally, I added Echoing Horn, and I’ve been pretty impressed by this card. The main counterplay to Sableye decks is removing Pokémon from play, usually with Collapsed Stadium. Echoing Horn allows you to bring back these Pokémon, and find enough targets to get six easy Prizes before your opponent.
Here are some other cards you can consider in this deck:
- Nest Ball: More Nest Ball means more consistency. Nest Ball is good at various stages of the game, but it is one of the cards you’ll send to the Lost Zone the fastest, so I don’t feel like that many copies are needed.
- Collapsed Stadium: There are multiple reasons to play Collapsed Stadium in this deck. One of them is that if you play Collapsed Stadium before your opponent, they can’t play their own Collapsed Stadium, which means they can’t, for example, play a Lumineon V then discard it on the same turn. An early Collapsed Stadium can be an issue for Lugia VSTAR decks if they don’t have board space for their two Archeops. The other main appeal of this Stadium is that you want three Comfey in play for the very early game, but they quickly become useless. Collapsed Stadium allows you to remove one of your Comfey from the board in order to replace it with a more useful Pokémon. Also, in the mirror match, you can discard a Pokémon that was damaged by Sableye. However, the issue of Collapsed Stadium is that, in the midgame, it can often help the opponent more than you. For example, if you’re setting up damage on a Pokémon for a late game Kyogre KO, you can’t play Collapsed Stadium or the opponent will simply discard it from play.
- Tropius EVS: Lugia VSTAR can be an issue. When preparing for the EUIC, Ithiel Arki and myself considered Tropius as an answer to Tyranitar V. It’s the best one-Prize, Basic, Grass-type attacker available for this role. However, while useful, Tropius wasn’t enough to change the matchup, and having it made the Energy base more awkward in all other matchups.
General tips


Kyogre is a Lost Zone variant, and as such, the usual tips for piloting Lost Zone decks apply here: think ahead about what you want to do and which resources you’ll need. Battle VIP Pass is obviously the main card you can throw away after the first turn, but which other cards can you get rid of? This depends on the matchup. Lost Vacuum has low value once you’ve reached ten cards in the Lost Zone in most matchups, but against Mew, being able to remove Path to the Peak can be important. In some matchups, like the mirror match, you can get rid of Kyogre, which also means that Energy Recycler is not needed (beyond one to make sure your Mirage Gate always hit), but in others, it’s the most important card in the deck.
Conversely, Colress’s Experiment is usually a card you always keep, but if you’re playing against a deck which plays no disruption cards (like the mirror match), and you already have a full Lost Zone and a stacked hand, you might not need it. I’ll discuss below how to play most of the important matchups and which cards are important.
When doing your first search through the deck, you don’t need to figure out your exact six Prizes, but there are three things you should take note of. First is whether any of your Pokémon are Prized. This is so you know whether Hisuian Heavy Ball is useful or not. If you happen to hit Hisuian Heavy Ball off a Flower Selecting later in the game, you need to know whether you need it or not. Second, count your Energy. Knowing how many of your Energy cards are Prized, and which ones, lets you know at any time what Energy cards you can get with Mirage Gate. If you need to use Kyogre in the late game, it’s also very important to know how many Energy you can discard.
Finally, count your Mirage Gate and Energy Recycler, if it’s in a matchup where you might use Kyogre. If one Energy Recycler is Prized against, say, Lugia, you should probably make sure you don’t Lost Zone any other!
An important skill to master is planning a turn. In many decks, but especially in Lost Box variants, you should have an idea at the beginning of every turn of what you can do, and a backup plan if you can’t. Make sure you don’t waste a turn by trying to do something too ambitious! Restraint is key, even in a turbo deck.
For example, let’s say this is my board going second. After using two Flower Selecting, a Colress’s Experiment, and Concealed Cards, I have a good hand, only missing three cards in the Lost Zone (one Flower Selecting and a Lost Vacuum) to get a turn 1 Mirage Gate. I can use Battle VIP Pass for a third Comfey and a Dragonite V, and retreat to the Comfey. If I find a switching card (Switch Card or Escape Rope) or Lost Vacuum with Flower Selecting, I can then search for the other piece thanks to Forest Seal Stone, and retreat to Greninja and Dragonite (depending on my opponent) in order to attack on turn 1.
The issue is that if I can’t find either of these cards, I will have to end my turn without doing anything. Instead, a safer play is to use Battle VIP Pass to get Cramorant, and simply retreat to use Spit Innocently for 110 damage. The upside isn’t as high as using Moonlight Shuriken or Dragon Gale, but it’s better than doing nothing! Plus, in many matchups, benching a Pokémon V without actually using it can be heavily punished by the opponent.
(Of course, things can vary depending on what the opponent does. If the opponent’s Active Pokémon is a Lugia V with a Regenerative Energy, for example, hitting it with Cramorant is pointless, and it might be better to try for the KO, especially if you don’t think your opponent will be able to KO your Pokémon V on the Bench next turn if you fail to achieve it.)
What to try to achieve on any given turn also depends on how the game is going. If you’re ahead, you don’t need to take risks. However, if you’re behind, you might need to try desperate moves to come back in the game. Therefore, it helps to have an idea of how the game is progressing at a larger scale. Deciding how you’re going to take all six Prizes is known as Prize mapping, and it’s important in this kind of deck. Depending on your opponent’s board, you may have to decide early on if you’re going to need Kyogre, if using Dragonite V or Raikou V can help you, or if you should just use Sableye over and over. I’ll discuss some examples of Prize maps in the matchups section.
Finally, let’s talk about Kyogre, the most intimidating card in the deck. Getting Aqua Storm to work is not as easy as it looks, and there are some things you need to consider even on the first turn of the game if you plan on using Kyogre. First, consider how many Energy are available to you. You have 11 Energy cards in your deck. In order to use Aqua Storm for 250 damage, you need eight Energy (three on Kyogre and five in your deck). That means that you can only afford to “lose” three Energy cards in your Prizes or your Lost Zone. Sending an Energy to the Lost Zone is usually not a big deal, but they can add up quickly, so keep an eye on that! Note that you rarely need to use Aqua Storm for 250 damage, and 200 or even 150 can be enough, depending on the matchup and the board state.
There are other places where your Energy can be “lost” for Aqua Storm purposes, though. If you have Energy left in hand after attaching one to Kyogre, they can’t be used. The main way to get rid of Energy from your hand is Concealed Cards: remember to use it every turn. Similarly, if you have Energy attached to your Pokémon in play, they can’t be used. Therefore, don’t attach Energy when you don’t need to. It can be useful to have an Energy on a Comfey in case your Beach Court is removed, though.
The second thing to keep in mind when planning to finish the game with Kyogre is that Kyogre only hits the Bench, so if you only damage the Bench, your opponent could send another Pokémon Active. For example, let’s say you need to take your last three Prizes against Goodra VSTAR by Knocking Out a Goodra VSTAR and a Radiant Greninja on their Bench (and they have another Goodra VSTAR Active). The opponent can always bring the damaged Goodra VSTAR Active to prevent that, so try to damage both Goodra VSTAR. It’s better to put two damage counters on two Goodra VSTAR (putting both in range of a 250 damage Aqua Storm) than seven on one Goodra VSTAR (putting it at 200, but letting the other survive Aqua Storm). Similarly, against Mew, you’ll usually damage two Genesect, but try to have a plan for if the opponent uses Psychic Leap to take a KO and bring one of the damaged Genesect Active. It might be better to put some damage on three of the opponent’s Genesect V so that even if one gets Active (or is removed with Collapsed Stadium), you can still KO the two others.
The other thing to keep in mind on the turn when you’re using Kyogre is how to sequence your final turn. Usually, you want to do the following. First, remove Energy from your deck using Mirage Gate, if there are any. Then, draw (or Lost Zone) the rest of your deck using Colress’s Experiment, Flower Selecting, and Concealed Cards. If you have two Comfey in play (and enough ways to search), that can get rid of an eleven-card deck! Cards like Nest Ball, Pokégear, and even Forest Seal Stone can also search for more cards. Finally, use Energy Recycler to put Energy back in the deck, and Mirage Gate to attach the missing Energy to Kyogre.
The awkward part can happen if some of the important part of the combo (usually Mirage Gate and Energy Recycler) are still in your deck. You don’t want to lose a game because a Flower Selecting gives you the choice between your last Mirage Gate and your last Energy Recycler! There is no universal solution to this issue, and sometimes you’ll have to take a (small, but non-zero) risk of losing to the order of your deck, but in some cases, you can find ways to avoid or minimize these risks. For example, using Raikou V’s Fleet-Footed to draw a card can let you find resources without having to sacrifice a card to the Lost Zone.
Matchups
Finally, let’s discuss some of the main matchups to know about.
Lost Box (mirror match)
Against other Lost Zone Box decks, including SableZard, the game is basically a race. Thanks to the Turbo engine, you should be able to get the lead (Lost Vacuum lets you put cards in the Lost Zone faster than the opponent). Ideally, it’s better not to play down a two-Prize Pokémon, as it can be a liability in the late game, but don’t hesitate to do so if you need to attach a Forest Seal Stone in order to find a Colress’s Experiment or some other key card: it’s better to have a board with one undesirable Pokémon than to draw dead. Get Manaphy out as soon as possible (unless the opponent is SableZard, which can’t hit the Bench). Assuming the opponent has theirs in play as well, you should aim to KO Manaphy with Sableye as fast as possible. A common play is to use Lost Mine to put 70 damage on Manaphy, 20 on each of two Comfey, and 10 somewhere else. This way, if the opponent plays down Manaphy again, you can use Lost Mine to KO Manaphy and a Comfey. If Manaphy isn’t in play, you can attack with Radiant Greninja. Even if you can’t take two Prizes this way, remember that your opponent can’t remove their Pokémon in play (unless they play Collapsed Stadium, which is unusual), so putting 90 on a Cramorant or Greninja still means that you can get some easier Prizes with Sableye afterwards. In other words, the real value of Greninja is that it puts up to 180 damage in play, rather than the 120 from Sableye.
Conversely, make sure that you save your Klara to get back important cards, especially Manaphy but also Sableye. Klara, Sableye and Manaphy are key cards in this matchup and you should avoid sending them to the Lost Zone. Conversely, Kyogre is basically useless, and Energy Recycler is not very important either. As a side note, against SableZard, you don’t actually need Manaphy. This gives you a lot more flexibility with your Supporters, and in my experience makes the matchup favorable.
The other key card in the mirror match is Switch Cart. Since the matchup is a Prize race where both players try to put as much damage on the opponent’s board as possible, Switch Cart’s healing effect is very important as it can set the opponent back. Try to use them to heal your Pokémon as much as possible.
Lastly, keep an eye for opportunities to board lock your opponent. If they fill their Bench and have no Sableye in play, then don’t take any KO! Instead, use your Sableye to fill their board with damage counters. They’ll probably be stuck attacking your Sableye with Cramorant. You can wait until they KO two Sableye, get them back with Klara, and so on. Basically, in this situation, you can add 120 damage to their board each turn while they only add 80 (by Knocking Out Sableye). Then, at some point, you can catch up and simply take multiple Prizes in one turn with Lost Mine.
Against Lost Zone Giratina, the same advice applies, as Giratina basically plays like a slower Lost Box in this matchup (beware of Roxanne, though). The only difference is that the opponent may try to use a Giratina in the late game since its HP can let it tank attacks. You can keep your Dragonite V to take the last two Prizes on a Giratina VSTAR, assuming you dealt some damage to it with Sableye or Greninja beforehand.
Lugia VSTAR / Archeops
Lugia VSTAR is one of the deck’s toughest matchups: they have high HP Pokémon, which are hard to KO, and they can heal the damage you spread with Radiant Tsareena or even Collapsed Stadium. Plus they play multiple Judge. That said, it’s not unwinnable by any means.
The first way to win is to capitalize on an opponent’s poor start and to KO their only Lugia V quickly with Raikou or Dragonite. However, this is unlikely to happen. Assuming that the opponent sets up properly, Kyogre is likely going to be your best way to win.
First of all, if the opponent fills their Bench with Pokémon other than Radiant Tsareena, you can use Radiant Greninja followed by Sableye to KO both Archeops. Even if they use Collapsed Stadium to remove one, you’ll still have gotten rid of their Energy acceleration. This severely reduces their options. For example, if they don’t have a Tyranitar V charged up with Single Strike Energy when you KO their Archeops, they won’t be able to OHKO a Dragonite V.
Most of the time, though, the opponent will have Radiant Tsareena in play, or at least an open spot for it. If Tsareena is in play, the priority is to get rid of it or it will heal damage every turn and prevent you from setting up Kyogre plays. Use your first Lost Mine to put 120 on Tsareena. Even if it gets Collapsed Stadium’d away before you can finish it off, it’s a net benefit for you. If Tsareena is not in play yet, you can use Greninja to damage an Archeops and another Pokémon first, then force Tsareena to come in.
Generally speaking, your goal is to take two or three Prizes, then take the last three or four with Kyogre. You have to account for your opponent switching their Active Pokémon and removing one Pokémon from play with Collapsed Stadium, though. For example, let’s assume you took one Prize already on Radiant Tsareena, and your opponent’s board is Lugia VSTAR, two Archeops, Tyranitar V, Lumineon V, and Stonjourner. In this situation, you can’t prepare for a four-Prize Kyogre attack, because your opponent can always remove one of their Pokémon V (most likely Lumineon) from play with Collapsed Stadium, then keep another one (Tyranitar or Lugia) in the Active spot, even if you play Escape Rope, so the most Prizes you can take with Kyogre is three: one two-Prizer and one one-Prizer. Therefore, you should try to take two more Prizes (usually with Sableye spam, but you can use Dragonite V to remove a Tyranitar V, for example), while putting some damage on Lugia VSTAR, then use Kyogre to take your last three Prizes. Note that if they can’t Collapsed Stadium anymore, and you have some Escape Rope remaining, you don’t have to damage Lugia VSTAR. You can use Escape Rope to make sure Tyranitar V is on the Bench, and take three Prizes off it and an Archeops or Stonjourner. This can be easier, as you can damage Tyranitar V to the point where a three Energy Aqua Storm is enough to take your last Prizes.
Of course, all of this is made harder by your opponent using Judge. Thankfully, Lugia is not the most consistent deck and may not find good ways to draw cards. They can’t make good use of Gift Energy since you can just take KOs with Lost Mine, which doesn’t activate it. If they don’t have a perfect game, you can definitely win.
Mew VMAX
If the Prize mapping against Lugia is highly dependant on what they play down, the Prize mapping against Mew is at its most straightforward. First, KO a two-Prize Pokémon. Ideally, you can use Raikou V (or Dragonite V) to KO a Mew V or Genesect V on the first or second turn, but you can also use Sableye twice (or Cramorant then Sableye, but only against Genesect; damaging a Mew V will simply lead to the opponent healing it with Psychic Leap). Then, whittle down two Genesect V until you can KO both at the same time with Greninja or Kyogre. Since you only take two Prizes before ending the game, the opponent can never play Roxanne.
That said, they will still have opportunities to disrupt you with Judge. Your main lose condition is bricking off Judge. Don’t hesitate to play down three Comfey so that even if you draw poorly after Judge, you can still sacrifice a Comfey and keep drawing cards. The deck is consistent enough that you’ll usually find your way out of a bad hand. The Pokégear is actually pretty nice to give the deck a bit more consistency!
Kyogre is a useful card in this matchup but mostly if things go bad at first. You can definitely win just by taking Prizes with Sableye and Greninja. For example, two Lost Mine and a Radiant Shuriken (three turns) will KO two Genesect. Of course, the Mew player can heal with Switch Cart. If they manage to get out of range of your KOs, that’s where Kyogre can come into play. Overall, I consider this matchup to be positive, although nothing is ever easy with Mew.
Note that the above applies mainly to the Double Turbo Energy variant of Mew. Against the Fusion Strike Energy variant, you play the same way (ignore the Meloetta and focus on Genesect), but since they play less disruption, the matchup is easier.
Gardevoir ex
Gardevoir is a favorable matchup, because they play a lot of low HP Pokémon that you can target. Radiant Greninja poses an immediate threat to Ralts and Kirlia, so the Gardevoir player must play Manaphy very quickly. You can then use Sableye to deal with Kirlia, Manaphy, and Ralts over multiple turns and get a Prize lead. Since the Gardevoir needs to damage their Pokémon to attach Energy to them, that makes it much easier to take Prizes off Pokémon like Gardevoir CRE. Echoing Horn can also be used in the late game to get easier Prizes if needed.
Just be careful about spreading damage: if you put damage on many Pokémon, the opponent can heal that damage while taking a KO thanks to Cresselia. It’s better to only damage one Pokémon at a time with Sableye.
Goodra VSTAR
Goodra is an unfavorable matchup, but Echoing Horn makes it playable. The main issue in this matchup is that Goodra VSTAR is tanky and the opponent won’t give you easy Prizes. They can use Melony or Raihan to power up Goodra VSTAR faster even if they don’t have access to Mirage Gate, so they don’t need to play down a lot of Comfey. That said, they’ll still use Comfey in the early game in order to set up. Your first priority should be to deal with these Comfey (ideally with Moonlight Shuriken) to remove them from play and slow down your opponent. If there are two more one-Prize Pokémon in play (Cramorant and Radiant Greninja, for example), you can get rid of them so you just need to KO a Goodra VSTAR for your last two Prizes. You can do so by using Sableye to put ten damage counters on a Goodra VSTAR, putting it in range of Dragon Gale (even after Rolling Iron’s damage reduction). The opponent will use Moisture Star, but you can then repeat the operation. If you had a good start, you should be ahead in Prizes so you can afford to lose that turn.
Good Goodra players will avoid putting that many Pokémon in play, though, and will only play down two Comfey and a Greninja, then one or two Goodra. In this case, you should still threaten to KO Goodra VSTAR with Dragonite (the usual play is Lost Mine to put ten counters on Goodra and two on Greninja). Then you can KO Goodra for two Prizes, Greninja for one Prize, and use Echoing Horn to bring back a Comfey and KO it too.
The two other tricks to keep in mind are the following. First, if there’s only one Benched Pokémon, you can use double Escape Rope to bring Goodra out of the Active Spot, then bring it back again, in order to remove Rolling Iron’s protection. Second, Kyogre can be used in the late game to take KOs on, for example, Greninja and a Benched Goodra, which doesn’t have Rolling Iron’s protection. Note that Roxanne will make these kind of plays harder, though.
All in all, the matchup is not easy, especially if the opponent plays V Guard Energy and/or Crystal Cave (which can put their Goodra VSTAR out of range of Dragonite V after Lost Mine), but you can win with precise play and a bit of luck.
Conclusion
I hope that this guide was useful to you! LZ Kyogre is honestly one of the most unique decks in the format, and I really love the way it plays. It’s also good, and I think it’s decently positioned in the metagame, especially if Gardevoir and Giratina pick up in play. Note that it’s also possible to play Kyogre in other versions of Lost Zone Box, without Dragonite V, Raikou V or Forest Seal Stone. In Japan, lists with only one-Prize Pokémon (usually Greninja, Sableye and Zamazenta) are the most common core for Kyogre. However, it’s worth noting that Lost Box has decreased a lot in popularity and success after the release of SV2, so Lost Box mirror matchs are not as much of a consideration. In our format, where we still face other Lost Box decks, the Turbo engine gives the deck more early game power and is likely the best build overall.
Thanks for reading as always!
Stéphane